Data Tables is a plug-in for the jQuery Javascript library. DataTables provide us flexibility to search, list, sort and pagination using jquery. We can also simply use ajax with datatables too. So in this tutorial, i will tell you how to use datatables in laravel 5 application, after this you can simply use with all version like 5.1 to upcomming laravel 5.5
So, in this example i will use yajra/laravel-datatables-oracle package for datatables, that provides very simple and provide us there are lots of feature using laravel methodology.
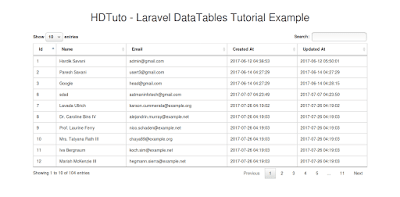
If you are new and you don't know how to manage it then don't worry, i going to give you example from scratch. Last you will get layout as like bellow:

After then we need to generate some dummy records for demo. So let's run bellow command and get dummy records.
Now we will add routes in web.php file as like bellow:
routes/web.php
Here,we require to create new controller MyDatatablesController that will manage two method of route. So let's put bellow code.
app/Http/Controllers/MyDatatablesController.php
At last we require to create blade file, will bootstrap and jquery layout. So let's add bellow code: resources/views/datatables.blade.php
Now we can our example so run bellow command for quick run:
Now you can open bellow URL on your browser:
i hope you found your solution...

Install Package:
first of all we will install yajra/laravel-datatables-oracle package by following composer command in your laravel 5 application.
composer require yajra/laravel-datatables-oracle
After successfully install package, open config/app.php file and add service provider and alias.
config/app.php
'providers' => [
....
Yajra\Datatables\DatatablesServiceProvider::class,
],
'aliases' => [
....
'Datatables' => Yajra\Datatables\Facades\Datatables::class,
]
Add Dummy Records:
I think you have users table because laravel provide default migration for users table. So if you don't have then run migration and get users table.After then we need to generate some dummy records for demo. So let's run bellow command and get dummy records.
php artisan tinker
>>> factory(App\User::class, 90)->create();
Add Routes:
Now we will add routes in web.php file as like bellow:
routes/web.php
Route::get('my-datatables', 'MyDatatablesController@index');
Route::get('get-data-my-datatables', ['as'=>'get.data','uses'=>'MyDatatablesController@getData']);
Create Controller:
Here,we require to create new controller MyDatatablesController that will manage two method of route. So let's put bellow code.
app/Http/Controllers/MyDatatablesController.php
<?php

namespace App\Http\Controllers;

use Illuminate\Http\Request;

use Datatables;

use App\User;

class MyDatatablesController extends Controller

{

 /**

     * Displays front end view

     *

     * @return \Illuminate\View\View

     */

    public function index()

    {

     return view('datatables');

    }

    /**

     * Process ajax request.

     *

     * @return \Illuminate\Http\JsonResponse

     */

    public function getData()

    {

        return Datatables::of(User::query())->make(true);

    }

}
?>
Create Blade File:
At last we require to create blade file, will bootstrap and jquery layout. So let's add bellow code: resources/views/datatables.blade.php
  <!DOCTYPE html>

  <html lang="en">

      <head>

          <meta charset="utf-8">

          <meta http-equiv="X-UA-Compatible" content="IE=edge">

          <meta name="viewport" content="width=device-width, initial-scale=1">

          <title>Laravel DataTables Tutorial Example</title>

          <link href="//netdna.bootstrapcdn.com/bootstrap/3.2.0/css/bootstrap.min.css" rel="stylesheet">

          <link rel="stylesheet" href="//cdn.datatables.net/1.10.7/css/jquery.dataTables.min.css">

      </head>

      <body>

          <div class="container">

              <br/>

              <h1 class="text-center">HDTuto - Laravel DataTables Tutorial Example</h1>

              <br/>

              <table class="table table-bordered" id="users-table">

                  <thead>

                      <tr>

                          <th>Id</th>

                          <th>Name</th>

                          <th>Email</th>

                          <th>Created At</th>

                          <th>Updated At</th>

                      </tr>

                  </thead>

              </table>

          </div>

          <script src="//code.jquery.com/jquery.js"></script>

          <script src="//cdn.datatables.net/1.10.7/js/jquery.dataTables.min.js"></script>

          <script src="//netdna.bootstrapcdn.com/bootstrap/3.2.0/js/bootstrap.min.js"></script>

          <script>

          $(function() {

              $('#users-table').DataTable({

                  processing: true,

                  serverSide: true,

                  ajax: '{!! route('get.data') !!}',

                  columns: [

                      { data: 'id', name: 'id' },

                      { data: 'name', name: 'name' },

                      { data: 'email', name: 'email' },

                      { data: 'created_at', name: 'created_at' },

                      { data: 'updated_at', name: 'updated_at' }

                  ]

              });

          });

          </script>

          @stack('scripts')

      </body>

  </html>
Now we can our example so run bellow command for quick run:
php artisan serve
Now you can open bellow URL on your browser:
http://localhost:8000/my-datatables
i hope you found your solution...
Comments
Post a Comment